
Showing posts with label Spring Boot Microservices. Show all posts
Showing posts with label Spring Boot Microservices. Show all posts
Friday, May 20, 2022

Saturday, April 4, 2020
Spring Boot - RestTemplate Configuration
Maven Dependencies:
We required Two dependencies i.e. httpclient and spring-web in spring boot application.
How to use RestTemplate in Spring Boot?
We required Two dependencies i.e. httpclient and spring-web in spring boot application.
<dependency>
 <groupId>org.springframework.boot</groupId>
 <artifactId>spring-boot-starter-web</artifactId>
</dependency>
<dependency>
 <groupId>org.apache.httpcomponents</groupId>
 <artifactId>httpclient</artifactId>
 <version>4.3.5</version>
</dependency>
RestTemplateConfig.java
package com.example.user.config;

import org.apache.http.impl.client.CloseableHttpClient;
import org.apache.http.impl.client.HttpClientBuilder;
import org.springframework.beans.factory.annotation.Autowired;
import org.springframework.context.annotation.Bean;
import org.springframework.context.annotation.Configuration;
import org.springframework.http.client.HttpComponentsClientHttpRequestFactory;
import org.springframework.scheduling.TaskScheduler;
import org.springframework.scheduling.concurrent.ThreadPoolTaskScheduler;
import org.springframework.web.client.RestTemplate;

@Configuration
public class RestTemplateConfig {

 @Autowired
 CloseableHttpClient httpClient;

 @Bean
 public RestTemplate restTemplate() {
  RestTemplate restTemplate = new RestTemplate(clientHttpRequestFactory());
  return restTemplate;
 }

 @Bean
 public HttpComponentsClientHttpRequestFactory clientHttpRequestFactory() {
  HttpComponentsClientHttpRequestFactory clientHttpRequestFactory = new HttpComponentsClientHttpRequestFactory();
  clientHttpRequestFactory.setHttpClient(httpClient);
  return clientHttpRequestFactory;
 }

 @Bean
 public TaskScheduler taskScheduler() {
  ThreadPoolTaskScheduler scheduler = new ThreadPoolTaskScheduler();
  scheduler.setThreadNamePrefix("poolScheduler");
  scheduler.setPoolSize(50);
  return scheduler;
 }

 @Bean
 public CloseableHttpClient httpClient() {
  return HttpClientBuilder.create().build();
 }
}
How to use RestTemplate in Spring Boot?
Spring Boot API - Return Success Response
How To Return Success Response In Spring Boot API
In this post i am going to demonstrate that how we should return success responce in Spring boot rest API.
APIResponse.java
In this post i am going to demonstrate that how we should return success responce in Spring boot rest API.
@RestController
@RequestMapping("/api/user")
@Api(value = "user", description = "Rest API to get user", tags = "User API")
public class UserController {

 @Autowired
 private UserService userService;

 @RequestMapping(value = "/users", method = RequestMethod.POST, produces = "application/json")
 @ApiOperation(value = "Getting all user list", response = APISuccessResponse.class)
 @ApiResponses(value = { @ApiResponse(code = 200, message = "OK"),
   @ApiResponse(code = 401, message = "You are not authorized access the resource"),
   @ApiResponse(code = 404, message = "The resource not found") })
 public ResponseEntity<APISuccessResponse> getUsers() {
  APISuccessResponse responce = null;
  List<User> userList = null;
  try {
   userList = userService.getUsers();
   responce = new APISuccessResponse(HttpStatus.OK, "get Users List", userList);
  } catch (Exception e) {
   responce = new APISuccessResponse(HttpStatus.OK, "get Users List", userList);
  }
  return new ResponseEntity<>(responce, HttpStatus.OK);
 }

}
Output: API Response{
"status": "OK",
"message": "get Users List",
"responseStatus": "Success",
"statusCode": 0,
"responseCount": 2,
"responceObject": [
{
"id": 1,
"firstName": "Amit",
"lastName": "Kumar",
"email": "amit.kumar@abc.com",
"mobile": "9999993690",
"address": {
"houseNo": "123",
"state": "New Delhi",
"city": "Delhi",
"pinCode": "110068"
}
},
{
"id": 2,
"firstName": "Test",
"lastName": "Pathak",
"email": "tset.123@abc.com",
"mobile": "996633221155",
"address": {
"houseNo": "963",
"state": "Maharast",
"city": "Mumbai",
"pinCode": "258963"
}
}
]
}
APISuccessResponse.javapackage com.example.user.response;
import java.util.List;
import org.springframework.http.HttpStatus;
public class APISuccessResponse extends APIResponse {
/*
* Response object can be an array of object or single object
*/
Object responceObject;
public APISuccessResponse(HttpStatus status) {
super(status);
setResponseStatus("Success");
setStatusCode(0);
}
public APISuccessResponse(HttpStatus status, String message, Object responceObject) {
super(status, message);
this.responceObject = responceObject;
setResponseStatus("Success");
setStatusCode(0);
setResponseCount(responceObject instanceof List<?> ? ((List<?>) responceObject).size() : 1);
}
public APISuccessResponse(HttpStatus status, Object responceObject) {
super(status);
this.setResponceObject(responceObject);
}
public Object getResponceObject() {
return responceObject;
}
public void setResponceObject(Object responceObject) {
this.responceObject = responceObject;
}
}
APIResponse.java
package com.example.user.response;

import org.springframework.http.HttpStatus;

public class APIResponse {

 /*
  * Http Status code of response
  */
 private HttpStatus status;

 /*
  * Responce Message
  */
 private String message;

 /*
  * Response Status string:Success or Failure
  */
 private String responseStatus;

 /*
  * Response Status code
  */
 private int statusCode;

 /*
  * Number of returned objects
  */
 private int responseCount;

 public APIResponse(HttpStatus status) {
  this.status = status;
 }

 public APIResponse(HttpStatus status, String message) {
  this(status);
  this.message = message;
 }

 /*
  * this is required while deserializing test response to create object
  */
 public APIResponse() {

 }

 public HttpStatus getStatus() {
  return status;
 }

 public void setStatus(HttpStatus status) {
  this.status = status;
 }

 public String getMessage() {
  return message;
 }

 public void setMessage(String message) {
  this.message = message;
 }

 public String getResponseStatus() {
  return responseStatus;
 }

 public void setResponseStatus(String responseStatus) {
  this.responseStatus = responseStatus;
 }

 public int getStatusCode() {
  return statusCode;
 }

 public void setStatusCode(int statusCode) {
  this.statusCode = statusCode;
 }

 public int getResponseCount() {
  return responseCount;
 }

 public void setResponseCount(int responseCount) {
  this.responseCount = responseCount;
 }

}
APIErrorResponse.javapackage com.example.user.response;
import java.time.LocalDateTime;
import org.springframework.http.HttpStatus;
public class APIErrorResponse extends APIResponse {
private LocalDateTime timestamp;
public APIErrorResponse(HttpStatus status, String message, int statusCode) {
super(status, message);
this.timestamp = LocalDateTime.now();
setStatusCode(statusCode);
setResponseStatus("error");
setResponseCount(0);
}
}
Friday, June 21, 2019
Friday, May 10, 2019
Swagger Integration In Spring Boot Application
Spring Boot RESTful API Documentation With Swagger 2
Step -1: Add maven dependencies into pom.xml
Step -1: Add maven dependencies into pom.xml
<parent>
 <groupId>org.springframework.boot</groupId>
 <artifactId>spring-boot-starter-parent</artifactId>
 <version>2.0.0.RELEASE</version>
 <relativePath/> <!-- lookup parent from repository -->
</parent>
.  .  .
<dependency>
    <groupId>io.springfox</groupId>
    <artifactId>springfox-swagger2</artifactId>
    <version>2.8.0</version>
    <scope>compile</scope>
</dependency>
<dependency>
    <groupId>io.springfox</groupId>
    <artifactId>springfox-swagger-ui</artifactId>
    <version>2.8.0</version>
    <scope>compile</scope>
</dependency>
.  .  .
package javaiq.in.springframework;

import org.springframework.boot.SpringApplication;
import org.springframework.boot.autoconfigure.SpringBootApplication;

@SpringBootApplication
public class Application {
    public static void main(String[] args) {
        SpringApplication.run(Application.class, args);
    }
}
Step -2: Create Swagger Config file using @Configuration and @EnableSwagger2
- @EnableSwagger2 - This is used to enable the swagger configuration during application startup.
- Docket - It is a builder which acts as a primary interface in swagger-springmvc framework. It returns below things.
- ApiInfo - It returns a ApiInfoBuilder which specfies the title,description etc of the Rest API's.
- Select() - select() method returns an instance of ApiSelectorBuilder, which provides a way to control the endpoints exposed by Swagger.
- Apis - provides RequestHandlerSelectors which specified basepackage to scan for all the controllers.
- Paths() - Provides the mapping endpoints of our API's.
- PathSelectors.any() - This is used to add multiple comtroller into swagger-ui.
Step -3: add swagger configuration :- SwaggerConfig.java
package javaiq.in.springframework.config;

import org.springframework.context.annotation.Bean;
import org.springframework.context.annotation.Configuration;
import org.springframework.web.servlet.config.annotation.ResourceHandlerRegistry;
import org.springframework.web.servlet.config.annotation.WebMvcConfigurationSupport;
import springfox.documentation.builders.ApiInfoBuilder;
import springfox.documentation.builders.PathSelectors;
import springfox.documentation.builders.RequestHandlerSelectors;
import springfox.documentation.service.ApiInfo;
import springfox.documentation.service.Contact;
import springfox.documentation.spi.DocumentationType;
import springfox.documentation.spring.web.plugins.Docket;
import springfox.documentation.swagger2.annotations.EnableSwagger2;
import static springfox.documentation.builders.PathSelectors.regex;
import com.google.common.base.Predicate;
import com.google.common.base.Predicates;

@Configuration
@EnableSwagger2
public class SwaggerConfig {
 @Bean
 public Docket productApi() {
  return new Docket(DocumentationType.SWAGGER_2).select()
    .apis(RequestHandlerSelectors.basePackage("javaiq.in.springframework.controllers"))
    // .paths(regex("/product.*"))
    // .paths(paths())
    .paths(PathSelectors.any()).build().apiInfo(metaData());
 }

 private ApiInfo metaData() {
  return new ApiInfoBuilder().title("Spring Boot Example With Swagger")
    .description("\"Spring Boot Example With Swagger\"").version("1.0.0")
    .license("Apache License Version 2.0").licenseUrl("https://www.apache.org/licenses/LICENSE-2.0\"")
    .contact(new Contact("Sanjeev Lahariya", "http://javaiq.in", "sanjeevlahariya1812@gmail.com")).build();
 }

 // Describe your apis
 /*
   private ApiInfo apiInfo() { return new ApiInfoBuilder() .title(
   "Hotel Management Rest APIs") .description(
   "This page lists all the rest apis for Hotel Management App.")
   .version("1.0-SNAPSHOT") .build(); }
  */
 // Only select apis that matches the given Predicates.
 private Predicate<String> paths() {
  // Match all paths except /error
  return Predicates.and(PathSelectors.regex("/customer.*"), Predicates.not(PathSelectors.regex("/error.*")));
 }
}
Step -4: Add entity class:- Meaasge.java
package javaiq.in.springframework.domain;

import javax.persistence.Entity;
import javax.persistence.GeneratedValue;
import javax.persistence.GenerationType;
import javax.persistence.Id;

@Entity
public class Message {

 @Id
 @GeneratedValue(strategy = GenerationType.AUTO)
 private Integer id;
 private String player;
 private String message;

 public Message(String player, String message) {
  this.player = player;
  this.message = message;
 }

 public String getPlayer() {
  return player;
 }

 public void setPlayer(String player) {
  this.player = player;
 }

 public String getMessage() {
  return message;
 }

 public void setMessage(String message) {
  this.message = message;
 }
}
Step -5: Create controller:- MessageController.java
package javaiq.in.springframework.controllers;

import org.springframework.web.bind.annotation.PathVariable;
import org.springframework.web.bind.annotation.RequestMapping;
import org.springframework.web.bind.annotation.RequestMethod;
import org.springframework.web.bind.annotation.RestController;

import javaiq.in.springframework.domain.Message;

@RestController
@RequestMapping("/message")
public class MessageController {

 @RequestMapping(value = "/sendMessage/{messsage}", method = RequestMethod.GET, produces = "application/json")
 public Message message(@PathVariable String messsage) {
  Message msg = new Message(messsage, "Hello admin " + messsage);
  return msg;
 }

}
Test your application with swagger.
http://localhost:8080/swagger-ui.html
http://localhost:8080/v2/api-docs
http://localhost:8080/swagger-ui.html
http://localhost:8080/v2/api-docs

The above Swagger implementation is without documentation look like this.

Step -6: Test your application with swagger.
http://localhost:8080/swagger-ui.html
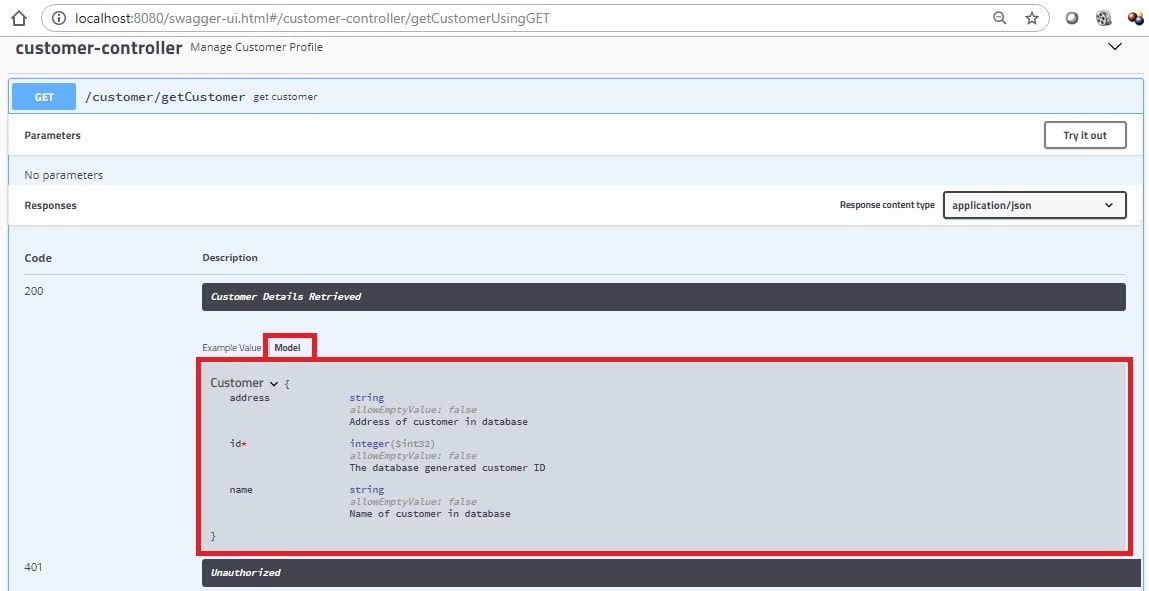
Now let see Spring Boot RESTful API Documentation With Swagger 2.
Note:- Swagger configuration is same as above just need to change in entity/model class & in controller class.
Customer.java
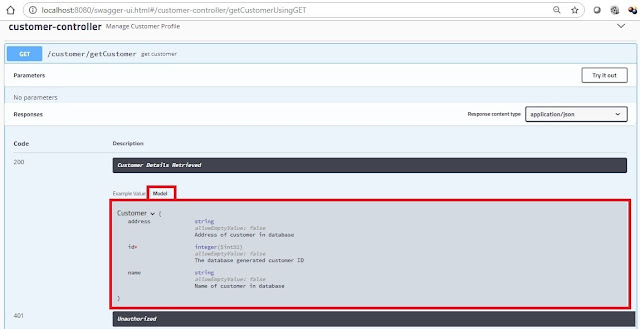
Q- How to change jar/war file name while craete a build in spring application?Now let see Spring Boot RESTful API Documentation With Swagger 2.
Note:- Swagger configuration is same as above just need to change in entity/model class & in controller class.
Customer.java
package javaiq.in.springframework.domain;

import javax.persistence.Entity;
import javax.persistence.GeneratedValue;
import javax.persistence.GenerationType;
import javax.persistence.Id;

import io.swagger.annotations.ApiModelProperty;

@Entity
public class Customer {

 @Id
 @GeneratedValue(strategy = GenerationType.AUTO)
 @ApiModelProperty(notes = "The database generated customer ID", required = true)
 private Integer id;

 @ApiModelProperty(notes = "Name of customer in database")
 private String name;

 @ApiModelProperty(notes = "Address of customer in database")
 private String address;

 public String getName() {
  return name;
 }

 public void setName(String name) {
  this.name = name;
 }

 public Integer getId() {
  return id;
 }

 public void setId(Integer id) {
  this.id = id;
 }

 public String getAddress() {
  return address;
 }

 public void setAddress(String address) {
  this.address = address;
 }
}
CustomerController.java
package javaiq.in.springframework.controllers;

import io.swagger.annotations.Api;
import io.swagger.annotations.ApiOperation;
import io.swagger.annotations.ApiResponse;
import io.swagger.annotations.ApiResponses;
import javaiq.in.springframework.domain.Customer;
import javaiq.in.springframework.domain.Product;

import org.springframework.http.HttpStatus;
import org.springframework.http.ResponseEntity;
import org.springframework.web.bind.annotation.RequestMapping;
import org.springframework.web.bind.annotation.RequestMethod;
import org.springframework.web.bind.annotation.RestController;
import org.springframework.ui.Model;
import org.springframework.web.bind.annotation.*;

@RestController
@Api(value = "Customer", description = "Manage Customer Profile", produces = "application/json")
@RequestMapping("/customer")
public class CustomerController {

 @ApiOperation(value = "get customer", response = Customer.class)
 @ApiResponses(value = { @ApiResponse(code = 200, message = "Customer Details Retrieved", response = Customer.class),
   @ApiResponse(code = 500, message = "Internal Server Error"),
   @ApiResponse(code = 404, message = "Customer not found") })
 @RequestMapping(value = "/getCustomer", method = RequestMethod.GET, produces = "application/json")
 public ResponseEntity<Customer> getCustomer() {
  Customer cust = new Customer();
  cust.setName("Amit");
  cust.setId(5);
  cust.setAddress("New Delhi");
  return new ResponseEntity<Customer>(cust, HttpStatus.OK);
 }
}
<build>
    <finalName>${project.groupId}/${project.artifactId}-${baseVersion}</finalName>
</bulid>
Tuesday, April 9, 2019
Spring Boot Microservices Architecture
1. What is the difference between spring mvc and spring boot ?
2. Spring Boot Starters ?
3. Spring boot microservices architecture?

4. What should we learn in spring boot microservices ?
5. how to handle Exception Handling, HATEOAS, filtering and input Validation for RESTful Web Services ?
6.How to version your Spring boot RESTful Web Services ?
2. Spring Boot Starters ?
3. Spring boot microservices architecture?

- API Gateway : ZUUL or Kong API Gateway
- Breaker Dashboard : Hystrix
- Service registry : Eureka Server
- Message Broker : kafka or rabbitmq
4. What should we learn in spring boot microservices ?
- ZUUL : API Gateway
- Eureka : Dynamic scaling(Eureka Naming Server)
- Hystrix : Fault Tolerance
- Spring Cloud Sleuth and Zipkin :- To Enabling Centralized Logging for Distributed tracing of microservices.
- Centralized Configuration : Centralized Configuration of spring boot microservice using Spring Cloud Config Server.
- Actuator : To monitor RESTful Services.
- Spring Cloud Bus : To exchange/referesh messages about Configuration updates.
- Swagger :- To document RESTful Web Services with Swagger
- Feign REST Client :
- Ribbon : To load balancing.
5. how to handle Exception Handling, HATEOAS, filtering and input Validation for RESTful Web Services ?
6.How to version your Spring boot RESTful Web Services ?
Subscribe to:
Posts (Atom)